Contents
- Payline
- Payline Access
- User Management
- API Key Handling Access
- API Credentials
- Generating or Rolling API Credentials
- Account Management
- My Account
- My Enquiry
- Password Reset
- Login Troubleshooting
- 2-Factor Authentication (2FA)
- View / Search Transaction Records
- Transaction Search Records
- Transaction Record Results
- Transaction Record
- Processing Transactions
- payMoto
- Processing a Refund
- Processing a Complete
- Reporting
- Generate Report
- Batch Processing
- Recurring Billing
- Adding Cards
- One-Off Bill charge
- Setting up Recurring Billing
Payline
Payline is a comprehensive, browser-based Windcave payment management platform that enables manual payments, refunds, recurring billing, and real-time transaction reporting. It offers a secure, centralized portal for management to review transactions as they occur, monitor payment terminal health, and manage user permissions.
As an ideal, cost-effective solution, Payline enables organizations to seamlessly process credit card payments and scales effectively for call centres or businesses operating in card-not-present environments.
Payline Access
To access Payline, navigate to https://sec.windcave.com/pxmi3/logon and enter your username and password, then select Login.
User Management
Within your Payline login, you can manage and update your settings to suit your preferences. Simply navigate to User Accounts > My User to view and adjust your details.
User Information
Configure and personalize how Payline works for you. Adjust privacy settings for card number display (masking), choose your preferred time and date format, set default report outputs like CSV, PDF, HTML or XML, and select the language you would like to use across the platform.
Contact
The contact area lets you keep your details up to date. Your username is linked to an email address and mobile number, which are used for secure login, report delivery, and two-factor authentication (2FA). Here you can verify your identity for added services and manage how you receive notifications, including turning email or SMS alerts on and off.
User Verification
The User Verification is a required security process that enables the Payline approved user to sign up for new services and sign new or updated contracts. The steps below outline how to complete the verification process.
- Within your Payline login, navigate to User Accounts > My User, then under the Contact section select Setup User Verification
- Confirm the details are correct. Use ‘Require Password Change’ only if the password is lost or access has been renewed.
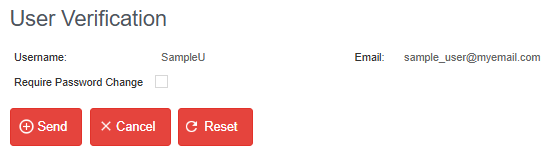
- Selecting Send triggers a Windcave Account Verification email to the user; when they open the link in that email, a confirmation message displays to verify their email address.
- Once complete, please contact Windcave to finalize the link between contacts for services or contracts as required.
API Key Handling
This section outlines specifics surrounding handling of Windcave API credentials. It is the responsibility of the merchant to ensure all API credentials generated are securely stored to prevent unauthorized access. Windcave also provides mechanisms to assist merchants with generating/rolling API credentials where required.
API Credentials
The below Windcave APIs utilize either a secret key or password to authenticate requests. After key/password generation, these credentials are hidden for added security to help prevent unauthorized users from accessing and using your API user without permission.
API credentials are separated by API with the exception of PxPay & PxFusion
- REST
- PxPay
- PxPost
- PxFusion
Each API integration uses a single Active Credential. This is the credential currently in use, often referred to as the Key or Password. It is the live credentials your system uses to authenticate API requests.
To support secure credential rotation, the system allows you to generate a Second Credential (also referred as Key2 or Password2). This secondary credential is created in an inactive state. It will not affect your existing connection until it is used for the first time.
When your system sends an API request using the Second Credential:
- The existing Active Credential is automatically retired and becomes invalid
- The Second Credential immediately becomes the new Active Credential
- You can then generate a new Second Credential at any time to prepare for your next rotation
This process ensures you can update credentials without interrupting your API traffic. Merchants can safely introduce new credentials, prepare changes, and switch over seamlessly simply by using the new credential in a live request.
Generating or Rolling API Credentials
For brand new API users, this process will generate your initial API credentials. Please note that an Active Credential prefix will appear, as all setups are tested by Windcave before activation. Generating a new credential clears any pre-existing credentials and ensures your Active Credential remains secret and secure.
- Navigate to the Payline Portal
- Log in using your Username and Password (See Password Reset for more details)
- From the navigation menu select User Accounts > My User
Note: Merchants managing multiple users can utilize the User Admin option. From there, search for and select the desired API user, then navigate to the Keys and Passwords tab.
- Scroll down to the API that requires new credentials. If multiple APIs are used by the same user, you may see more than one set of credentials listed.
- Click the Generate button for the intended API to create a new credential. The result will appear in the Kay2/Password2 field and must be copied and stored securely, as it will be hidden after the next step.
- Once saved, click the Apply or Update button to save the Key2/Password2 to your username.
Important: If you do not complete this step, Credential2 will not be applied to your username.
Note: If the new credential is lost or forgotten, this process can be repeated to generate replacement, provided it has not yet been used. - Key2/Password2 can be validated by comparing the Prefix field with your saved credentials.
- Once ready, submit an API request using the newly generated Key2/Password2. This will activate Key2/Password2 as the new credentials, replacing the previous active key/password.
Note: Activation occurs only after an API request is made with the new credentials; generating and applying Key2/Password2 alone does not replace the current active credential.
Account Management
Your Payline login allows you to view and update your CRM preferences.
Only authorized users may update certain areas.
For more details or extra access, contact your Windcave Account Manager.
My Account
From the navigation menu, select CRM Management > My Account.
This section organizes merchant information into various tabs based on details provided during setup. These include, basic account information (e.g. merchant ID and trading name), address, billing details (such as payment method, invoice delivery and currency), contact information, contract type, and any linked sub-accounts.
My Enquiry
My Enquiry allows merchants to submit enquiries to Windcave directly from their Payline account.From the navigation menu, select CRM Management > My Enquiry.
Select the option that best relates to your enquiry, enter detailed comments or questions and Submit to send to the applicable Windcave team.
| Enquiry Options | Description |
|---|---|
| Accounts Receivable | Select for information on Accounts Receivable, including help in paying an invoice or request special payment terms |
| Careers | Select for more information on career opportunities at Windcave |
| Integration | Select for more information on how to integrate to Windcave or for assistance resolving issues relating to an integration |
| Partnership | Select for more information on Commercial Partnership with Windcave for marketing and/or referrals |
| Pricing/Sales | Select for more information on pricing and sales of Windcave products and services |
| Support | Select to contact the Windcave Support team for assistance, comments or queries related to production account issues. |
Password Reset
When selecting the Forgot your Password link, you will be prompted to enter your username and email address.
Once submitted, you will receive an email from [email protected] containing a link to a secure session for the password reset.
Create a new password that meets the password criteria listed and click OK to save and login into Payline.
Login Troubleshooting
Below are common issues and recommended solutions. If problems persist, please contact Windcave Support.
| Issue/Statement | Description | Resolution |
|---|---|---|
| Incorrect Username/Password. Please try again or follow link below to reset your password. | Incorrect Username or Password has been entered | Check and re-enter your Username and Password.
If error re-occurs, select the Forgot your Password link to reset your password: |
| Max log in attempts reached. Please use the Forgot Password button to continue and if you are unsuccessful, please email [email protected] for further assistance. | The maximum number of login attempts has been reached | If you know your password, please contact the Windcave Support team to reset the attempts.
Alternatively, select the Forgot your Password link and reset your password. |
2-Factor Authentication (2FA)
Two authentication options are available via TOTP (Time-Based One-Time Password) or SMS, both of which add an additional layer of security for your Payline account.
SMS Authentication
SMS authentication allows an alternative to add extra security to your Payline login. For more information, please contact the Windcave Support team.
TOTP Authentication
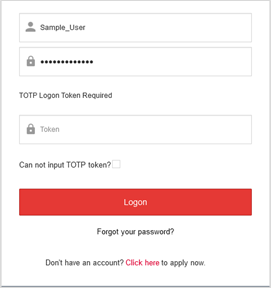
TOTP uses a 3rd-party application of your choice (e.g. Google Authenticator, Microsoft Authenticator, 1Password etc.) to generate a unique one time password code specific to your Payline account that changes automatically after a period of time.
When logging into your Payline account, you will be prompted for your username, password, and the authentication code currently displayed in your TOTP app.
Enabling TOTP Authentication
Follow the steps to enable TOTP authentication on your Payline User:
- Sign into your Payline account and navigate to User Accounts > My User
- Within the User Settings, select the box labeled Enable TOTP
- Your page will display a QR code. Use your chosen authentication app to scan this QR code and follow the prompts on your device.
Note - TOTP can be configured on multiple devices. Simple scan the QR code on each device to add the TOTP before proceeding to the Token Verify step. - Once connected to the authentication app, you will be given a unique one time password code to input into the Token Verify box displayed on your Payline screen. Select Confirm once done.
- The updated page will provide you with Backup Codes. Select Copy to Clipboard to easily copy and save these codes.
These backup codes will only appear once when TOTP is enabled, therefore these should be stored safely for future use.
TOTP Authentication Troubleshooting
The below troubleshooting examples are applicable where TOTP has been enabled:
| Issue | Description | Resolution |
|---|---|---|
| Unable to retrieve verification code | Authentication app is not retrieving a verification code | On the Payline login screen:
|
| Unable to access authentication app | The authentication app is unavailable or the Payline account cannot be linked/found. | You will need to re-generate the QR Code to re-establish the link between the authentication app and Payline. Sign into Payline using the Can not input TOTP token option as above. Once you are logged in, follow the process below:
|
If you are still unable to login after trying the above, please contact our Windcave Support.
View / Search Transactions
Transaction Search Records
The transaction search provides a real-time view of transaction activity on your Windcave account. If you manage multiple accounts, the transactions displayed will depend on the permissions assigned to your Payline user.
To search for a transaction, navigate to Transactions > Transaction Search option.
The below search criteria can be used to narrow down to a specific transactions.
| Parameters | Description |
|---|---|
| Card holder | The name value entered by the cardholder or read from the payment card |
| The email address provided by merchant shopping cart/Point of Sale system or cardholder when processing payment | |
| Phone Number | The phone number provided by merchant shopping cart/Point of Sale system or cardholder when processing payment |
| Card Holder Ip | The IP address of cardholder when processing payment (where cardholder IP has been provided) Note:This field may not be applicable to all integrations |
| Merchant Ref | The free text merchant reference that was used for a transaction request |
| Card Partial 6-4 | The first 6 and last 4 digits of the card number used to process the transaction |
| Card Partial 4 | The last 4 digits of the card number used to process the transaction |
| DeviceId | Merchant defined device identifier |
| CA Device | Serial number of Windcave card reader |
| CA Station | Device Name assigned by Windcave By default this will be the serial number of the device, however can be customized upon merchant request. |
| AuthCode | Authorization code of the transaction |
| TxnRef | Unique per transaction reference provided by POS for each transaction |
| User | The username where the transaction was processed |
| DpsBillingId | DPS Billing ID or Transaction ID The Billing ID is a reference that is unique to the merchant's customer that is associated with the credit card information stored securely at Windcave |
| BillingId | The Billing ID is a reference that is unique to the merchant's customer that is associated with the credit card information stored securely at Windcave |
| Payment Method | Payment method used in the transaction |
| Transaction Type | Transaction type of a transaction (e.g. Purchase, Auth Refund etc) |
| Authorized | Confirms if the transaction is authorized 0 = Not authorized 1 = Authorized |
| Card Mac | Method authentication code (Unique cryptographic card identifier) |
| PAR | Payment Account Reference - A unique identifier for a cardholder's account, assigned by the card scheme |
| Start Date / End Date | The start and end dates for the transaction search For example: Start date 18/05/2025, End date 01/06/2025 = Search will display all transactions between these two dates |
| DpsTxnRef | The Windcave unique transaction number, i.e. the transactionid (used for REST API integrations) This can be used to search using the DpsTxnRef on the top right of the Transaction Query page 
|
Transaction Record Results
Search results will display with an overview of transaction information as below:
| Field | Description | ||||
|---|---|---|---|---|---|
| DateTime | The date and time of the transaction | ||||
| Group | The Group associated to the transaction | ||||
| Group Account | The Group Account associated to the transaction | ||||
| TxnType | The type of transaction, e.g. Prch = Purchase Comp = Complete Auth = Authorization Void = Void Rfnd = Refund Validate = Validate IncrementalAuth = Incremental Authorization | ||||
| Amount | The total amount of the transaction | ||||
| Cur | The currency of the transaction | ||||
| Card Holder | The name on the credit card for the transaction | ||||
| CardNumber | The credit card number of the card holder | ||||
| Brand | The credit card brand used for the transaction (e.g. Visa, MC, Amex, EFTPOS) | ||||
| Response | The response text to accompany the response code (ReCo) with additional information | ||||
| ReCo | The response code for the transaction. Explanation of the ReCo is usually provided in the Response | ||||
| Authorized | Confirms if the transaction is authorized:
| ||||
| Merchant Ref | The free-text field submitted by the merchant during the transaction request | ||||
| DeviceId | Merchant defined device identifier | ||||
| Void | Displays whether the transaction is Void
| ||||
| Complete | Displays whether a pre-authorization transaction has been completed
|


Transaction Record
Selecting a transaction from the transaction search will bring up details related to that transaction.
Transaction
Provides general information about the details related to the specific transaction.
| Field Name | Description |
|---|---|
| DpsTxnRef / TransactionId | Unique Id for the transaction. |
| Transaction Date | The date and time of the transaction. The timezone of the user is shown in the brackets |
| Txn Type | The type of transaction (eg Purchase, Refund, Auth) |
| Payment Method | Payment method used in the transaction |
| Authorized | Confirms if the transaction is authorized 0 = Not authorized 1 = Authorized |
| ReCo | The response code for the transaction |
| Response Text | The response text to accompany the response code (ReCo) with additional information |
| Total Amount | Total amount and currency of the transaction |
| IP Address | The cardholder's IP address at the time of transaction. Note: This is not applicable to all transactions so may be empty |
Merchant Data
Provides general merchant data related to the specific transaction.
| Field | Description |
|---|---|
| Amount | The total amount and currency of the transaction |
| Amount Surcharge | The surcharge amount on the transaction (if applicable) |
| Amount (Cash) | The cash amount taken out on the transaction (if applicable) |
| Amount (Tip) | The tip amount on the transaction |
| Amount (Merchant Donation) | If enabled, displays the merchant discount on the transaction |
| Amount (Donation) | If enabled, displays the donation amount on the transaction |
| Currency Exponent | The currency decimal places |
| Merchant Reference | The free-text field submitted by the merchant during the transaction request |
| TxnData1 | Custom merchant data field |
| TxnData2 | Custom merchant data field |
| TxnData3 | Custom merchant data field |
| Avs Action | The address verification service (AVS) action taken for transaction * Only applicable to merchants utilizing AVS |
| Product SKU | Product SKU (Stock Keeping Unit)
Allows specific rules to be set for the merchant that can trigger 3DS and Risk Management rules. This field will only populate if applicable. |
| Send Merchant Receipt | Entering an email address allows user to send a merchant receipt to the email addresses entered Important: Windcave configuration is required to automate this process - Please contact Windcave Support to update if required |
Customer
Contains customer data related to the specific transaction.
| Field | Description |
|---|---|
| Phone Number | The phone number provided by the merchant or cardholder during the payment process |
| Home Phone Number | The home phone number provided by the merchant or cardholder during the payment process |
| Account Info | Account / Group assigned to the customer (if applicable) |
| First Name | First name provided by the merchant or cardholder during the payment process |
| Last Name | Last name provided by the merchant or cardholder during the payment process |
| Avs Post Code | The AVS data post code |
| Avs Street Address | The street address of the customer |
| Shipping Details | The details provided by the merchant or cardholder during the payment process - Shipping Name / Address / Postal Code / Phone Number / Country / Method |
| Shipping Sender Postal Code | The merchant post code |
| Billing Details | The customer or company Billing Name / Address / Postal Code / Phone Number / Country |
| Send Customer Receipt | Entering an email address allows user to send a customer/cardholder receipt to the email address provided Important: Windcave configuration is required to complete this setup - Please contact Windcave Support to finalize the process. |
| Processing | |
| Stored Card Indicator | Indicates the reason a stored card is being used charged at the time of the transactions |
| Card Number 2 | Displays the token details for the cardnumber2 |
| Card Number | The credit card number of the card holder |
| Card Mac | Method authentication code (Unique cryptographic card identifier) |
| Date Expiry | The expiry of the credit card |
| Brand | The credit card scheme / brand |
| Transact by CardNumber2 | Option to complete the transaction using Card Number 2 details |
| Block Card | |
| Block Card Reason | Displays or allows merchant to select the reason to block the credit card used in the transaction |
| Block This Card | Allows the merchant to block the credit card used in the transaction |
| Processing | |
| IP Address | Displays the IP address used when processing the transaction |
| User Agent | Displays the operating system/software used when processing the transaction (e.g. Mozilla Firefox) |
| IP Country Code | Displays the IP Country Code used when processing the transaction |
| Block IP | |
| Reason | The reason to Block the IP used for the transaction |
| Block IP Minutes | The number of minutes to block the IP used on the transaction |
Risk
Contains risk management information for the specific transaction.
Note: Information is populated in this tab if the merchant has risk management enabled.| Field | Description |
|---|---|
| Rm reason | Risk management reason |
| Risk Score | Risk score of the transaction (based on the Windcave settings for the risk score profiles for the merchant) |
| Risk Score Text | Additional risk score information added for the transaction |
Account
Contains information about the merchant account for the specific transaction.
| Field | Description |
|---|---|
| Username | The username used to action the transaction |
| Group Name | The group associated to the username and the transaction |
| Group Account Name | The group account associated to the transaction |
| Customer Name | The name of the merchant |
| ProductName | The product details set-up for the username. This allows a merchant to have a single Payline user who can create sessions for multiple products (done with group accounts) |
| Acquirer Name | Name of acquirer |
| Caid | Card Accepter ID (i.e. merchant ID) |
| Catid | Card Acceptor Terminal ID |
Acquirer
Contains customer data related to the specific transaction.
| Field | Description |
|---|---|
| Liability Indicator Name | The liability shift information |
| Acquirer Date Time | The date/time stamp from the acquirer for the transaction |
| Stan | The System Trace Audit Number |
| Acquirer ReCo | The Response Code from the acquirer |
| Acquirer Host Name | The name of acquirer used to process the transaction |
| Acquirer Response Text | The text associated to the transaction that has been entered by the acquirer (further description for the Acquirer Response Code (ReCo) |
| 3DSecure Exemption Details | |
| Is Merchant Requested | Indicates if merchant has requested 3DS process manually |
| Exemption Type | Displays whether 3DSecure process is exempt no - Indicates 3DSecure was processed during this transaction yes - indicates 3DSecure may not have been processed during this transaction |
Processing
Contains information about how the specific transaction was processed.
| Field | Description |
|---|---|
| Client Type | The type code for client type used for transaction |
| Client Type Name | How the transaction was actioned (e.g. Internet) |
| PAN Entry Mode | How card was presented to payment terminal (e.g. MagStripe, ContactlessEMV, ContactEMV) |
| ODCVM Flag | ODCVM: On-Device Cardholder Verification Method
Indicates if the cardholder verified the payment directly on their device e.g. smartphone, smartwatch. 0 = normal 1 = digital wallet |
| Is Mobile Wallet | Indicates if the transaction was completed using Mobile Wallet:
0 = normal 1 = mobile wallet (ApplePay, GooglePay etc) |
| Cless From Factor Data | Indicates the factor data type used on the transaction:
20 = Card 21 = Mobile phone 22 = Tablet / E-reader 23 = Watch / Wristband 24-33 = Other |
| Void ReCo | The Response code if a transaction has been voided |
| Void DateTime (NZT) | The date and time on a transaction that has been voided |
| Route | |
| IP Address | The IP address of cardholder when processing payment (where cardholder IP has been provided)
Note: This field may not be applicable to all integrations> |
| Location Name | If enabled, displays the Location Name used for the transaction |
| Client Version | If available, the client SDK, or application version used for the transaction |
| Server | The code of the Server used for the transaction |
| Server Name | The name of the Server used for the transaction |
| Server IP | The IP of the Server used for the transaction |
| Applet Type | The application type for the transaction |
| Applet Version | The version number of the application type |
| SlotId | The Port slot ID |
| PxHost Id | The ID of the Windcave host used for the transaction |
| Transaction Id | The transaction identification number |
| Acquirer Host Name | The name of the acquirer host where the transaction was processed |
| Special Cases | |
| Is Stand In | Indicates if the transaction was processed via stand-in (authorization) |
| Offline Approval with Advice | Indicates if the transaction was processed with offline approval and subsequent advice |
| Auth Timeout Established | Indicates if an auth timeout was established and the transaction processed accordingly |
| Converted Auth/Complete To Purchase/Reversal/Advice | Indicates if the transaction has been updated from an auth/complete status |
| Timing | |
| Perimeter Elapsed (ms) | Indicates the time the transaction has taken to complete the predefined requirements |
| Elapsed (ms) | Indicates the time the transaction has taken to process |
| Acquirer Host Elapsed (ms) | The time the acquirer completed the transaction process |
| Terminal Elapsed (ms) | The time in which the transaction process was completed |
| Completion Date Time (NZT) | The date / time the transaction completed process |
Result
Contains information about the result of this specific transaction.
| Field | Description |
|---|---|
| Authorized | Confirms if the transaction is authorized 0 = Not authorized 1 = Authorized |
| ReCo | The response code for the transaction |
| Response Text | The response text to accompany the response code (ReCo) with additional information |
| Acquirer ReCo | The Response Code from the acquirer |
| Auth Code | The authorization Code assigned to the transaction - returned by the acquirer |
| Stan | The system trace audit number |
| ReCoPreProc | The response code for pre-processing completed before transaction |
| Avs Result | The result of Addresses verification service (AVS) check |
| Cvc2 Result Code | CVC code result |
| Date Settlement | Date of settlement of the transaction |
| Acquirer Date Time | Date and time the acquirer actioned the transaction |
| Liability Indicator Name | The liability shift information |
| Is 3DSecure Bypassed | Checkbox displays whether 3D Secure was used in the transaction Checked = 3D Secure was bypassed for this transaction Unchecked = 3D Secure was not bypassed for this transaction |
Refund Transactions
Can process refunds and displays results of matched refunds processed against this transaction.
| Field | Description |
|---|---|
| RxDate column | Date and time of the refund associated with the transaction |
| Amount column | Amount that was refunded for the transaction |
| Merchant Reference | Reference entered at the time of refund |
FPRN
Shows Fail Proof Result Notification details if used for the specific transaction.
Note: Details on this tab will update as FPRN is in progress or completed.| Field | Description |
|---|---|
| Start Date column | Date and Time of the notification |
| Elapse column | Time in milliseconds that the notification was actioned |
| Attempts column | Number of attempts for the notification |
| Status Code column | Status code associated to the transaction notification |
| Success column | Code whether the FPRN notification was delivered to the merchant 0 =Failed 1 =Success |
Reprocessing
Allows a merchant to manually update the transaction to Purchase or Auth if required.
| Button Name | Description |
|---|---|
| Purchase | Merchant can manually update the transaction to a purchase type |
| Auth | Merchant can manually update the transaction to an auth type |
Processing Transactions
PayMoto
To improve the ease of use for Mail Order Telephone Order (MOTO) transactions within Payline, the transaction menus Purchase, Validate and Auth have been consolidated to a single PayMoto screen.
Navigate to Transaction > PayMoto using the navigation menu
Enter the details into the required fields using the parameters below and select Add to process the transaction
| Parameter | Definition |
|---|---|
| Txn Type | The type of transaction to be used: Purchase – Immediate charge to card Validate – No charge to card’ used to check if card details are valid or not Auth – Hold amount on card; a complete must be submitted from Payline for settlement to occur |
| Amount | The amount you wish to bill the card for |
| Card Number | The credit card number of the card holder |
| Card Holder Name | The name on the credit card |
| Expiry Date | The expiry date of the credit card in MM / YY (month / year) format |
| Card Security Code | The non-embossed “security number” (3 digits for Visa / MasterCard, 4 digits for American Express). Please check with your bank if they support this feature |
| Card Holder Email | Email address of the customer |
| Save as Bill Card | When ticked a Windcave Token will be created, this token can be used to rebill this particular card |
| Reference Data | |
| Merchant Reference | Free text field. Enter any meaningful reference. Commonly used for transaction tracking and reconciliation. This field is only seen by you (the merchant), not your customer (the card holder) |
| TxnData1/2/3 | The TxnData fields are free text fields that can be used to store information against a transaction |
| TxnRef | The unique transaction reference (provided by the merchant) |
| Risk Override | |
| User Name 2 | Name of user who has Risk Override privilege |
| User Password 2 | Password (hidden) of user who has Risk Override privilege |
Processing a Refund
Refunds may be issued to credit card holders without requiring their card details. Multiple refunds can be processes, provided the total does not exceed the original purchase amount.
To process a refund, click on the Transactions then Transaction Search menu items. You can search for the transaction either by searching date ranges, the merchant reference or full credit card number.
Select the transaction you wish to refund, select the Refund Transactions tab, then press the Refund button. You will now be presented with the screen to enter your refund parameters.
| Parameter | Definition |
|---|---|
| Amount | The amount to be refunded |
| Expiry Date | Enter a new expiry date - Used if the original credit card has expired, however the same credit card number has been retained |
| Card Holder Email | Enter if the credit card holder should receive a copy of the refund |
| Merchant reference | Free text field. Enter any meaningful reference. Commonly used for transaction tracking and reconciliation |
| User Password | Enter the Payline password for the username signed in and completing the refund |
Important Notes:
- Most banks also set a “daily refund limit” for each merchant. If you are a processing a relatively large refund and experience difficulties with them returning “declined”, contact your bank to find out what your daily refund limit is.
- You can refund a transaction more than once. You can submit multiple refunds up until the value of the original transaction. For example, if a transaction is processed for $90 you can submit any number of refunds up until the $90 mark – this could equate to 3 $30 refunds.
- If you are processing a refund and feel that you have entered all the fields above correctly but continue to get a “declined” transaction response, it may be that you are currently not configured by your bank for “refund” transaction types. Contact the merchant services department at your bank to enable this function.
Processing a Complete
You can process ‘complete’ transactions by selecting Transactions and then Transactions Search from the menu. Locate a previously authorized transactions using the merchant reference, card number, cardholder name, or a date range.
Select the transaction you would like to process a complete for, then on the Complete Transactions tab press the Complete button. You will now be presented with the screen to enter your refund parameters.
| Parameter | Definition |
|---|---|
| Merchant Reference | Free text field. Enter any meaningful reference. Commonly used for transaction tracking and reconciliation |
| Amount | Enter the amount to complete the transaction for |
| Card Holder Email | Enter if the credit card holder should receive a copy of the complete transaction |
Reporting
Using Payline, merchants can generate reports on demand for defined date ranges and transaction types to support payment tracking and reconciliation. The reporting function includes comprehensive data on transaction history, settlement batches, refund activity and card type breakdowns.
Navigate to Reports on the left-hand menu to access your reporting options:
- Matching Reports shows all available report types.
- Ready Reports lists reports that are complete and available to view or download.
- Pending Reports displays reports that are still processing.
Tip: This page does not auto-refresh. Use Refresh to update the status of pending reports.
Generate Report
From the Reports display page, simply click on the report you want to generate.
Fill in the required fields using the configurable parameters, then click “Add” to start generating the report.
| Parameter | Definition |
|---|---|
| Title | Free text field to enter a meaningful report name or reference |
| Name | Name of the report selected i.e., Standard, Standard (Settlement Date) |
| Username | Payline username currently logged in |
| Email Report | Tick if you wish to have the report emailed (otherwise you can download) |
| Email address to email report to | |
| Format | The report file format to generate |
| Purch / Auth / Complete / Refund | Transaction types that you wish to have defined in your report |
| Results | The transaction results you wish to display - All / Authorized / Not Authorized |
| Start Date | The start date from which you would like to report on using the date (DD/MM/YYYY) and time (HH:MM) formats |
| End Date | The end date for which the report will be generated for using the date (DD/MM/YYYY) and time (HH:MM) formats |
You will be taken back to the main Reporting page and the report you have generated will sit under Pending Requests.
To check its status, select Refresh. Once the report is complete, it will move to Ready Reports.
Batch Processing
The Batch Processor is an online automation client that allows merchants to process large volumes of credit cards quickly and easily simply by uploading a CSV (comma separated values) file.
To upload a batch file, select Other on the left-hand menu and select Batch Upload.
Choose your file using Choose File then select Upload File.
After a successful upload, you will see a confirmation message, and a response batch file will appear under the Reports tab.
For more information on Payline batch formats and settings, please see Batch Processing here.
Recurring Billing
Windcave enables merchants to automate recurring transactions quickly, easily, and most importantly, securely, without the need to store sensitive credit card data.
Adding Cards
To set up automated billing on a card, it must first be added to the Payline Billing Vault.
From the left-side menu, select Bill Cards, then click Add to register a new card. Enter the required details and select Save.
| Parameter | Description |
|---|---|
| Billing Id | Billing ID that the first and subsequent transactions are referred to as.
The Billing ID is a reference that is unique to the merchant's customer that is associated with the credit card information stored securely at Windcave |
| Card Number | The credit card number of the card holder |
| Card Holder | The embossed name on the credit card |
| Merchant Reference | Free text field. Enter any meaningful reference. Commonly used for transaction tracking and reconciliation |
| Enabled | Check to make the billing card live |
| BillingId is Unique | Check to indicate the BillingId is a unique value |
| Date Expiry | Expiry date of the credit card |
| Issue Number | If card has an issue number, it can be entered here |
One-Off Bill charge
After adding the Bill Card above, you can locate it by selecting Billing Cards from the menu. There are two available search methods:
- Enter the DpsBillingId you wish to charge and press Enter to automatically locate you bill card
- Use the Merchant Reference and/or the Billing ID of the transaction, then select Search
Once you have found and/or selected the bill card you want to charge you can proceed to initiate a transaction by pressing the Transact button.
From the Bill Card screen, you can Update and Delete an existing Bill Card. If you attempt to update a record that not have an existing BillingID, you will be asked to provide one before any details can be located.
On the displayed screen, enter the one-off charge amount, complete the required fields and select Add.
| Parameter | Parameters |
|---|---|
| Merchant Reference | Free text field. Enter any meaningful reference. Commonly used for transaction tracking and reconciliation |
| Stored Card Indicator | Indicate the reason a card is being stored and/or charged for the transaction |
| Amount | Enter the amount for this one-off charge |
Setting up Recurring Billing
Once a Bill Card has been added, you can set up recurring payments. This allows you to automatically configure the card to be charged for a defined amount, at a chosen frequency, and for a specific duration.
From the Bill Card you have set up, select Add under the Associated Recurring Transactions
Recurring Transaction Search Parameters
| Parameter | Description |
|---|---|
| BillingId | The Billing ID is a reference that is unique to the merchant's customer that is associated with the credit card information stored securely at Windcave |
| Card Number | The masked credit card number of the card holder |
| Enabled | Checked confirms this recurring transaction is enabled (unchecked = disabled) |
| Amount | The amount to be re-billed |
| Start Amount | The merchant can bill an initial amount to the card (e.g., deposit amount). This payment will only be applicable for the first payment. Subsequent transactions will be billed based on the amount field above |
| Currency | The currency you would like to bill the customer in (only applicable to customers that currently have multi-currency options enabled) |
| Cycle | The frequency of the recurring payments |
| Recurring Count | The number of instances the card holder will be billed |
| Start Date / Time | The date and time from which the initial recurring payment will commence |
| Time Zone | The time zone that you want the billing card to be charged in |
| Merchant Reference | Free text field. Enter any meaningful reference. Commonly used for transaction tracking and reconciliation |
| Enable Invoices | Select this checkbox if Invoices should be sent for each recurring payment (This is sent to the User creating this recurring transaction and logged into Payline) |
| Retries Details | Important - Retries are only attempted if the 'Enable Invoices' option is checked |
| Retries Frequency | The frequency of the re-try attempts to process a payment, if the original payment has failed.
Select from the options in the drop-down:
|
| Retries Count | The number of retries to be completed at the frequency indicated if a transaction has failed. Example: Frequency is set to Weekly / Retries Count is set to 3
The failed recurring transaction will be attempted weekly until approved or 3 attempts maximum. |
A result page will display once the recurring payment is added:
| Heading | Description |
|---|---|
| Group Account | The Group account the recurring transaction is associated to |
| Amount | The amount that is set as the recurring transaction |
| Start Amount | The amount that will be charged on the first transaction |
| Currency | The currency the recurring transaction will be billed as |
| Cycle | The frequency of the recurring transaction |
| Transaction Count | The current number of instances the recurring charge has been billed |
| Recurring Count | The number of instances the recurring charge will be processed - Once this number is reached, the recurring payments will automatically stop |
| Start Date | The date from which this recurring payment will start |
| Next Cycle | The next date and time which the recurring payment will be processed |
| Time Zone | The time zone that this recurring charge is billed against |
Technical Support
Please contact [email protected] or visit Contact Us to find the phone number for your region.